Preparing all your interior image content and conveying image placement prior to submitting your manuscript helps ensure that your design and layout process goes as smoothly (and affordably) as possible.
To save you unnecessary time and expense, please review the information below and follow all applicable steps.
NEED EXTRA ASSISTANCE?
If you find that you are overwhelmed by this step and need help naming and assessing your images or adding placement tags within your manuscript, we would be happy to provide extra assistance with these steps for an hourly fee.
Request support here.
Steps to prepare your images
- ORGANIZE YOUR IMAGES. Copy ALL of your final image files into a single folder on your computer. Make sure to remove any extra or duplicate images.*
- CHECK IMAGE SIZING. Make sure your images are supplied at high resolution (a minimum of 300dpi at final desired output size) required for production in print. Confirm your images meet our minimum pixel dimensions below.
- NUMBER IMAGE FILES. Review the instructions below, decide which file naming approach works best for your book and use it consistently.
- ADD IMAGE PLACEMENT INFO TO YOUR MANUSCRIPT. Review the instructions below, decide which approach works best for your type of book and use it consistently.
- SUBMIT YOUR IMAGES. Once you’ve completed all of the above, send us your images with your manuscript.
*NOTE: image count fees are calculated by how many images we receive for processing; not how many ultimately get used in your book so this step will save you money.
CHECK IMAGE SIZING
- INTERIOR SINGLE-PAGE IMAGE with FULL BLEED
-

Book Size (w x h) Page Size + Bleed* Resolution Minimum Size Needed 5″ x 8″ 5.25″ x 8.25″ 300 dpi 1575 x 2475 pixels 5.5″ x 8.5″ 5.75″ x 8.75″ 300 dpi 1725 x 2625 pixels 6″ x 9″ 6.25″ x 9.25″ 300 dpi 1875 x 2775 pixels 6.14″ x 9.21″ 6.39″ x 9.46″ 300 dpi 1917 x 2838 pixels 7″ x 10″ 7.25″ x 10.25″ 300 dpi 2175 x 3075 pixels 7.5″ x 9.25″ 7.75″ x 9.5″ 300 dpi 2325 x 2850 pixels 8″ x 10″ 8.25″ x 10.25″ 300 dpi 2475 x 3075 pixels 8.5″ x 8.5″ 8.75″ x 8.75″ 300 dpi 2625 x 2625 pixels 8.5″ x 11″ 8.75″ x 11.25″ 300 dpi 2625 x 3375 pixels 11″ x 8.5″ 11.25″ x 8.75″ 300 dpi 3375 x 2625 pixels *(printer trims 1/8 inch off all sides) - INTERIOR FULL SPREAD IMAGE with FULL BLEED
-
Book Size (w x h) Page Size + Bleed* Resolution Minimum Size Needed 5″ x 8″ 10.25″ x 8.25″ 300 dpi 3075 x 2475 pixels 5.5″ x 8.5″ 11.25″ x 8.75″ 300 dpi 3375 x 2625 pixels 6″ x 9″ 12.25″ x 9.25″ 300 dpi 3675 x 2775 pixels 6.14″ x 9.21″ 12.53″ x 9.46″ 300 dpi 3684 x 2838 pixels 7″ x 10″ 14.25″ x 10.25″ 300 dpi 4275 x 3075 pixels 7.5″ x 9.25″ 15.25″ x 9.5″ 300 dpi 4575 x 2850 pixels 8″ x 10″ 16.25″ x 10.25″ 300 dpi 4875 x 3075 pixels 8.5″ x 8.5″ 17.25″ x 8.75″ 300 dpi 5175 x 2625 pixels 8.5″ x 11″ 17.25″ x 11.25″ 300 dpi 5175 x 3375 pixels 11″ x 8.5″ 22.25″ x 8.75″ 300 dpi 3375 x 5175 pixels *(printer trims 1/8 inch off all sides) - INTERIOR Imagery (no bleed, want to fit within margin)
-
Image Size (w x h) Resolution Minimum Size Needed 2″ x 3″ 300 dpi 600 x 900 pixels 3″ x 5″ 300 dpi 900 x 1500 pixels 4″ x 6″ 300 dpi 1200 x 1800 pixels 5″ x 7″ 300 dpi 1500 x 2100 pixels 6″ x 9″ 300 dpi 1800 x 2700 pixels 8″ x 10″ 300 dpi 2400 x 3000 pixels
FILE NUMBERING AND PLACEMENT TAGGING
WHAT TYPE OF BOOK ARE YOU WORKING ON?
Children’s book image intake is different from all other books. Follow the instructions that relate to the type of book you are working on.
Click on the type of book to see the instructions.
- CHILDREN’S PICTURE BOOKS
-
Option 1: Chronological Numbering + Tagging
In a simple children’s picture book, you may simply name each of your images with a number that indicates the chronological order in which it appears (1.tif, 2.tif, 3.tif… etc.).
NOTE: we use chronological order instead of page numbering as page numbering is subject to change. Also, some pages can feature multiple spot illustrations. Then add placement tags to your word document as shown below to indicate which text the image should appear next to.See image tagging examples:
<INSERT IMAGE 1.tif >
The puppy saw the cat around the corner.
—-page break—-< INSERT IMAGE 2.tif>
The cat did not feel like playing.
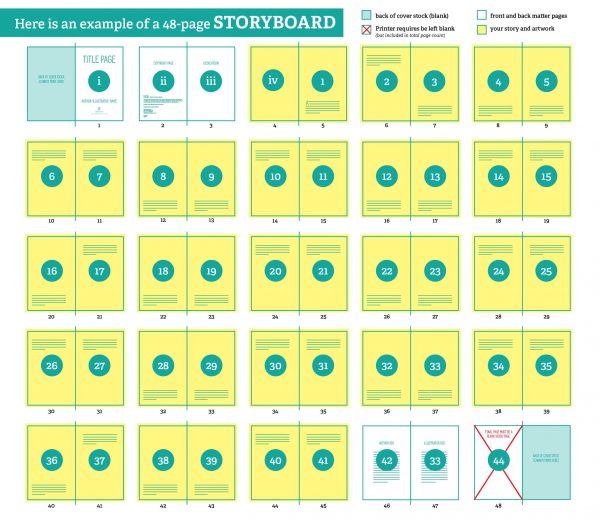
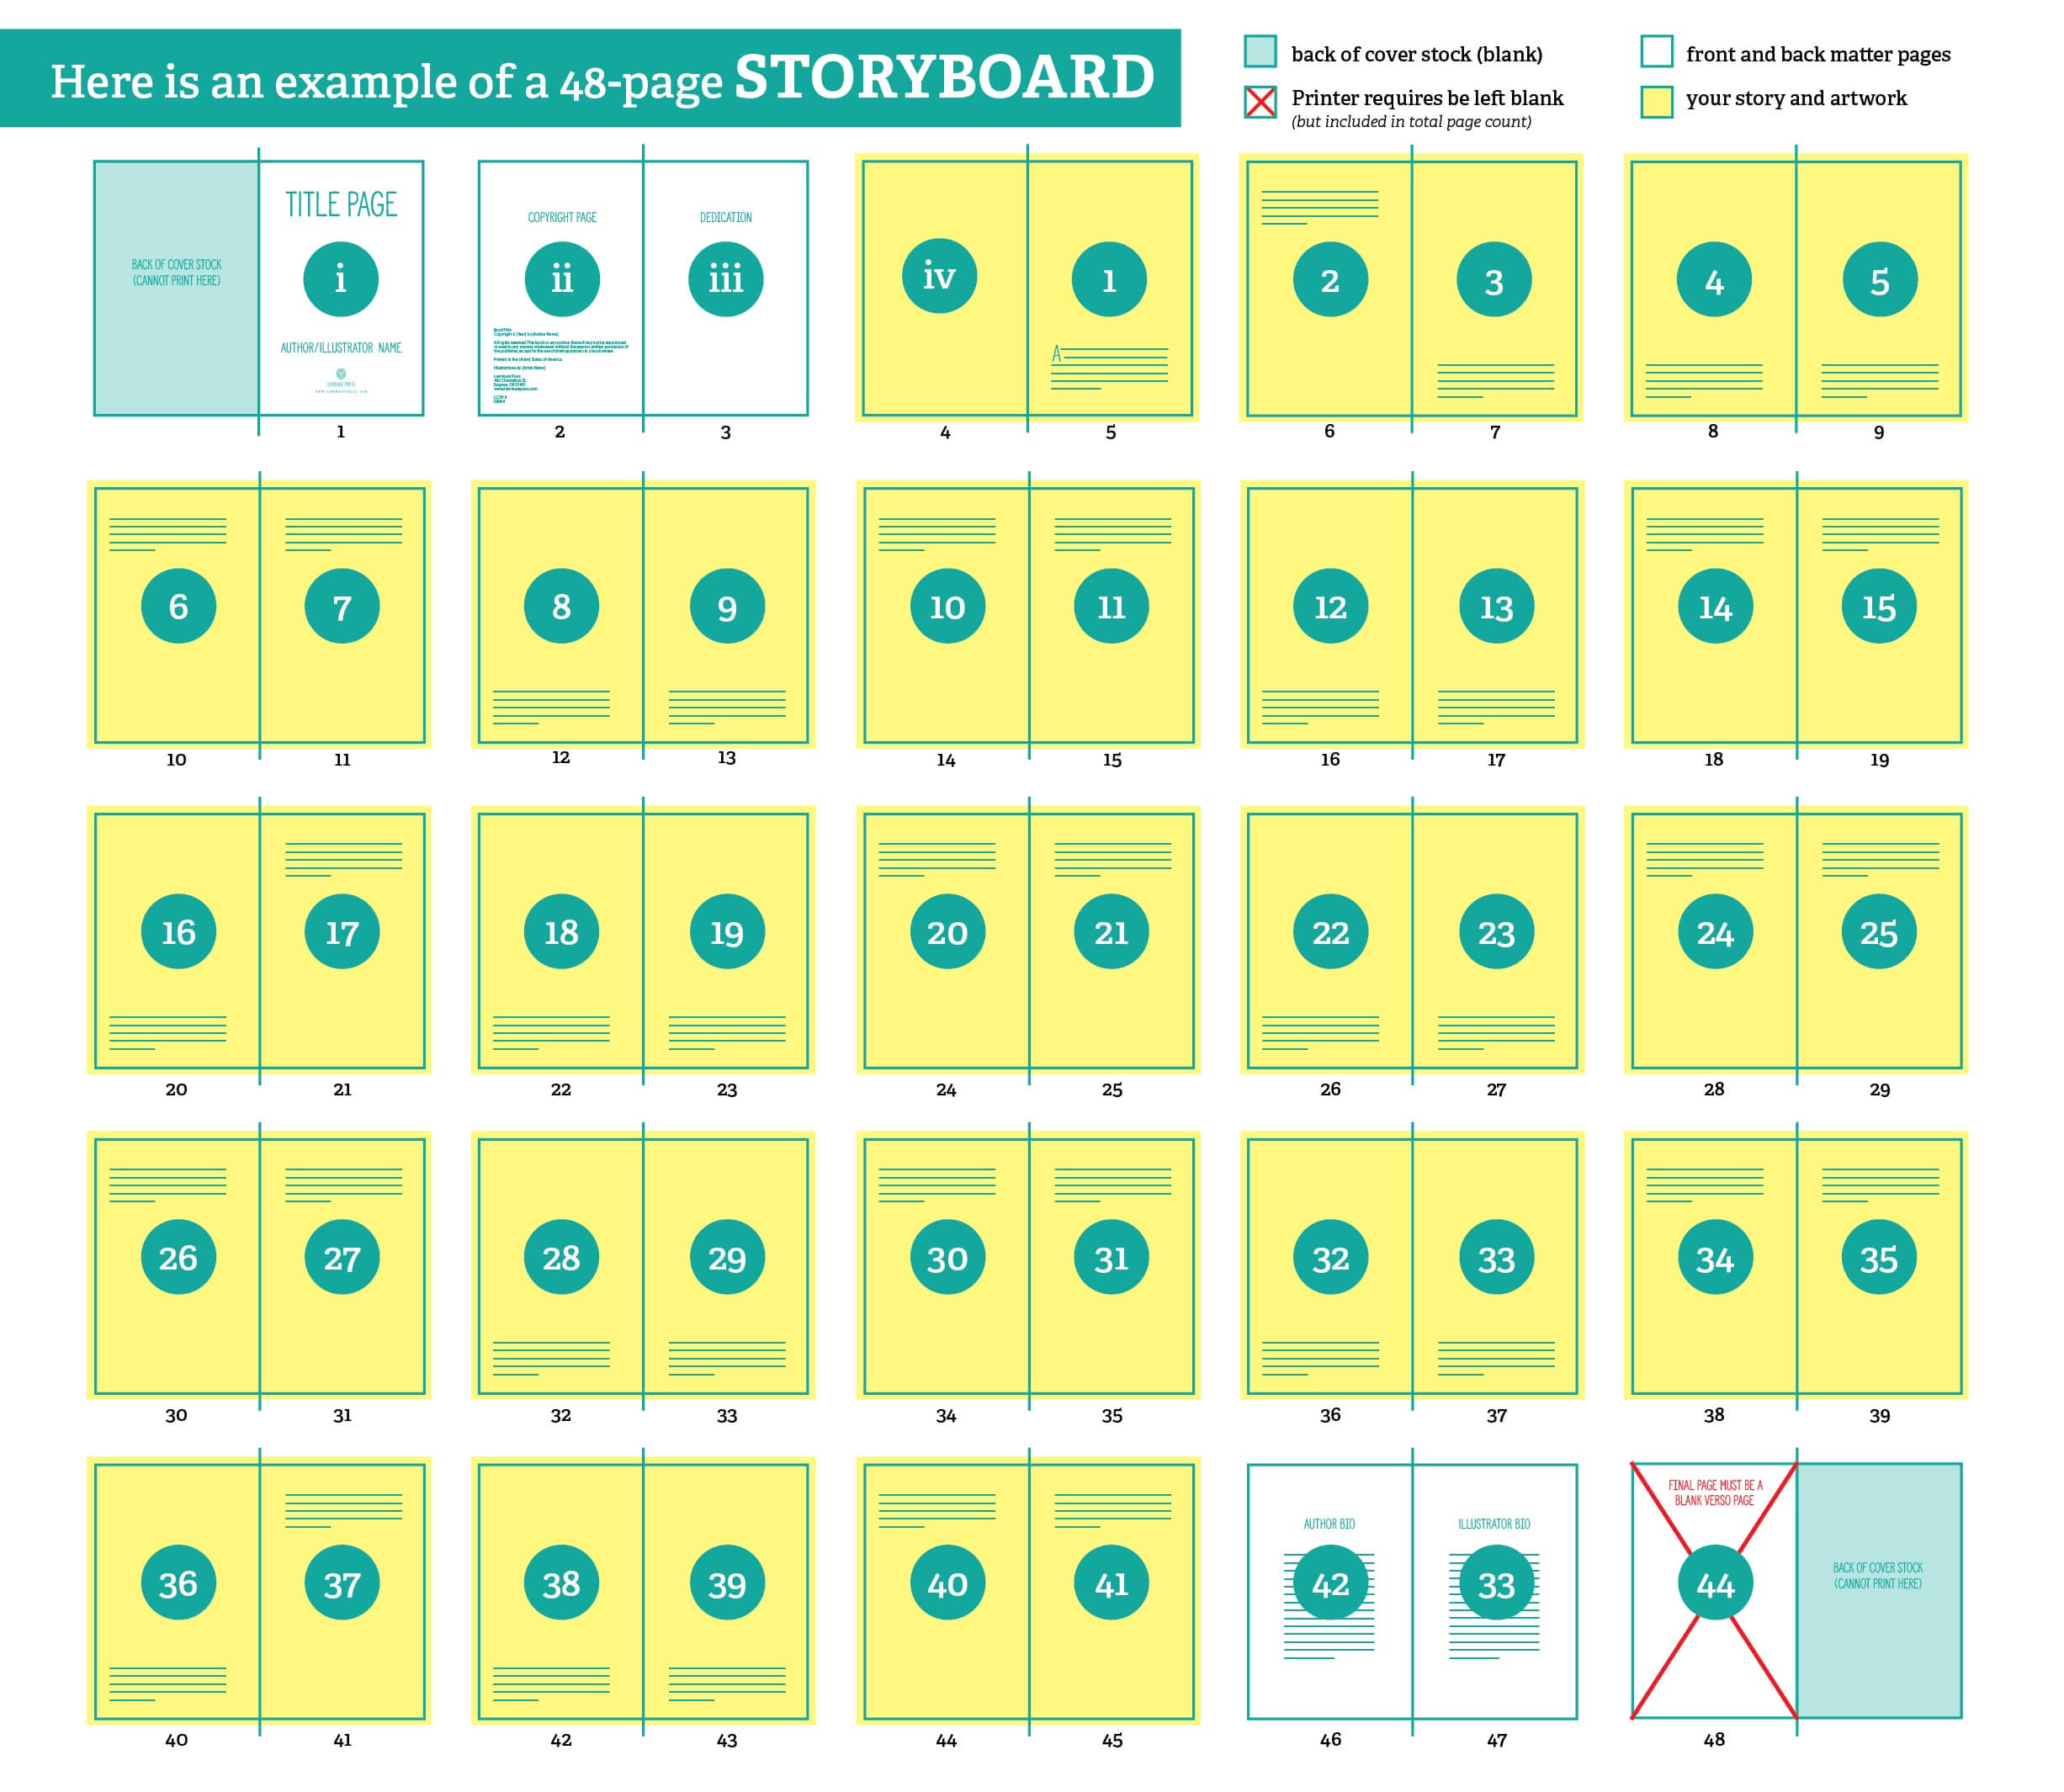
—-page break—-Option 2: Story-Boarding
It’s also helpful to provide a storyboard of your preferred rough book layout in the form of a multiple-page pdf. Although this does save you from having to do the image tagging step (above), it is not a substitute for submitting the Word doc of your manuscript OR providing all of the individual high res image files separately.
Here is an example of a storyboard shown in spread-view:
- ALL OTHER BOOK TYPES
-
In the case of more complex books, and multiple images, especially those requiring captions, we require a slightly different image file naming approach.
FILE NAMING:
You will need to name each image first by the chapter number, then the its chronological appearance within the chapter.For example, if the image is to appear in chapter 3 and is the 7th image to appear in that chapter, please name the file as follows:
03_07.tif
If you have 100 + chapters or images, you will need to number use a 3-digit numbering system as shown below:
003_007.tif
PLACEMENT INFO + CAPTIONS:
Once you have completed naming all of your image files, you will then need to add placement markers within your single, final manuscript Word doc to indicate image insertion points for said images using those EXACT file names. Please be sure to include any image captions or author notes within tags (< >) if applicable.Example of how to include your image tags within your manuscript doc:
<INSERT IMAGE 03_07.tif >
<CAPTION: Aunt Martha with her children, circa 1917>
<AUTHOR NOTE: Please crop this image down on the left>Want to keep images placed in your Word doc as well?
It is completely fine to leave your images placed in the Word doc of your manuscript HOWEVER this will only act as an extra visual guide and is NOT a substitute for the above steps of gathering all the images in a folder, following file naming conventions, and adding image tagging and caption info (shown above).
NEED EXTRA ASSISTANCE?
If you find that you are overwhelmed by this step and need help naming and assessing your images or adding placement tags within your manuscript, we would be happy to provide extra assistance with these steps for an hourly fee.
Request support here.